|
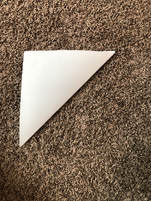
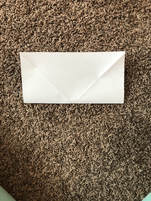
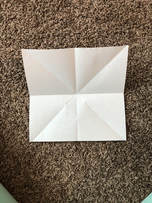
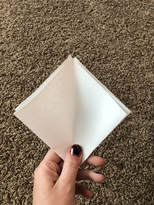
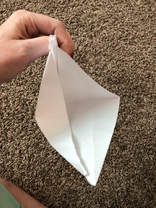
Some days you just feel like being crafty, but don't have the time, money, or energy to go to the store and get a bunch of craft supplies. Here at "e before i" we LOVE to craft in all sorts of ways, so today we thought we'd share of few DIY ideas. If you find yourself in the afore mentioned crafting pickle, here are a couple of ideas for you, using things you probably already have in your house. Our first crafting idea is origami! All you need is a sheet of paper. There are lots of tutorials all over the internet on how to make AMAZING paper sculptures. Today, we'll walk you through a very simple paper crane. WARNING: We are not origami masters and this is a VERY rudimentary crane. STEP ONE: Get yourself a square piece of paper.  Next, fold you paper corner to corner in all directions, and then unfold.
Pinch together the corners. Start by pinching two parallel corners and then move on to the rest. make sure the middle sections alternate being folded out and folded in to make a diamond shape.
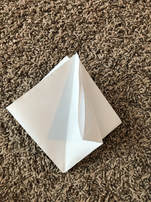
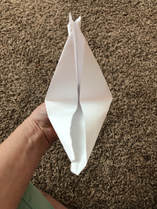
Now fold the outside corners on each side down towards the center to create a slim triangle.
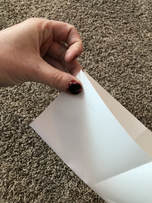
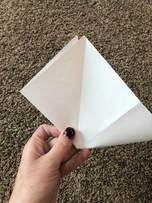
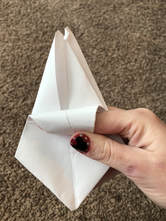
Unfold the triangle folds and pull out one of your corners. 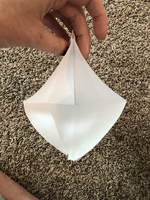 Using the creases from your previous fold, press the outside corners inwards.
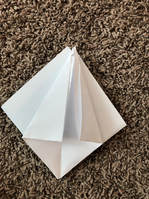
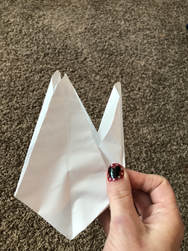
Be sure to do this on both sides. Crease your folds tightly so you once again have a slim diamond shape. 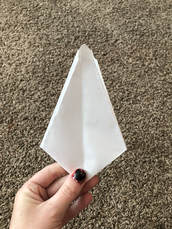 Roll or fold your outside corners downward to create the crane's wings.
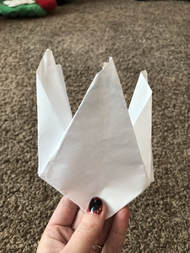
Pull the inside corners outward and crease them to stay standing out from the diamond shape. Do this on both sides.
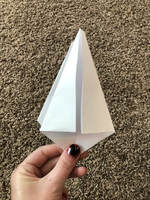
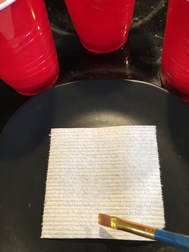
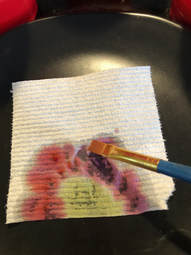
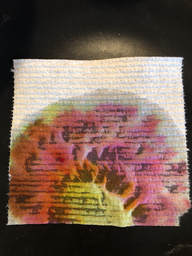
Pinch one of your side corners downward to create the crane's beak. 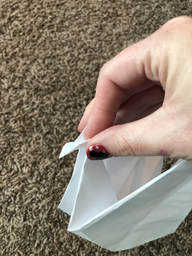 And now you have your very own paper crane! 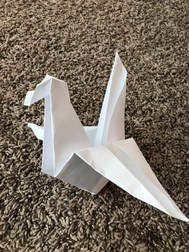 Again, we are by no means origami masters, but it can be a fun way to pass a little time when you are feeling crafty but don't have the materials you need. Our next crafting idea is simple, and great to do with kids! All you need is a square piece of tissue or toilet paper, water, food coloring, and a paint brush.
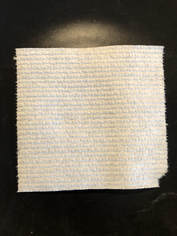
Start by mixing your food coloring into your water. I chose three colors, to mimic a sunset. 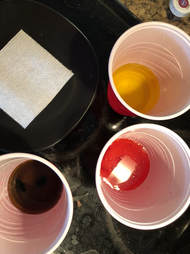 Using your tissue as your canvas and your food coloring water as watercolors, begin painting! Be sure to simply dab the water colors onto the tissue; trying to use regular brush strokes will tear your canvas.
Allow your creation to dry, and now you have your own micro watercolor painting! 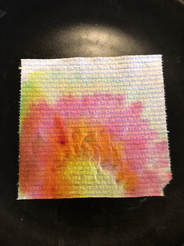 There are lots of quick crafting fixes, but we hope our ideas give you a good start! A major part of crafting, is getting creative and thinking outside the box when you encounter a road bump!
What sort of last minute crafts do you enjoy doing? Share your ideas in the comments!! We would love to hear from you!
0 Comments
Welcome to "e before i" Boutique!
We are so excited to be beginning this journey with you! We are three sisters/sisters-in-law with a variety of artistic passions. We have spent several years selling our products separately and finally thought - why not do it all together?! We offer unique, custom products that are always made by hand just for you! We guarantee satisfaction since we only make exactly what you want us to! Don't see what you're looking for? Contact us and we will see what we can do to make your shopping list complete! We wanted to take this opportunity to introduce ourselves to you and let you know what to expect from us in the future! On this website we feature three different categories of products to highlight our three different creative medium passions - Fabric, Paint, and Buttons. Leisl is our fabric crafter. Though she also dabbles a little in sign painting, her primary passion is sewing. She started taking classes when she was 8-years-old and is now graduated with a Bachelors Degree in Costume Design. When Leisl isn't sewing, or costuming productions for the local high school, she spends her time with her husband and twin girls, and volunteering on the local community arts council. She is so excited for you to become a part of OUR community when you start shopping at "e before i." Jessica has been surrounded by art from a young age. Growing up she admired the crafts and paintings created by her grandmother and enjoyed watching her dad sketch and paint. When she was young, she would sneak her dad's sketch books and spend hours looking at all his creations. It wasn't until after she was married with kids that she decided to pursue her passion for simple, family centered arts and crafts. Jessica loves to experiment with new ideas and techniques when she isn't busy with her husband and two little boys. Tenika has enjoyed buttons from a very young age. The real passion began a few years ago when she came across her grandmother's button collection. In looking for a way to share the buttons with her large extended family, she combined her passion of making jewelry with her new button discovery. The button art came from a request from a friend, and Tenika discovered a whole new passion! Working with buttons is what she does when she's not with her family or sneaking in some reading time. We hope that as you browse our inventory, you will love what you see. Each product is made with lots of hard work and love. It is our goal to bring you quality products that help express your passions through our own artistic passions. We believe that art is meant to be shared and that passions grow and thrive best in a positive, uplifting community where people are encouraged to participate and share. Please share our website with your family and friends! And always be sure to come back and inventory will change from time to time. If you are looking for one-of-a-kind pieces, last chance items, or sales - be sure to like our Facebook page "E before i Boutique." You can find it easily by clicking the link at the bottom of our homepage! Thanks for visiting "e before i" and we hope to see you again soon! |
AuthorLeisl, Jessica, and Tenika are so excited to bring you "e before i" the blog! A place of creativity and inspiration! ArchivesCategories |

 RSS Feed
Proudly powered by Weebly